Showing posts with label Battle of Trafalgar. Show all posts

Monday, 24 October 2022

Gaming in Oct 2022

  • 16 Oct - The Beast of Errinsford (OSE) - face-to-face
  • 21 Oct - Trafalgar Day game - Blood, Bilge and Iron Balls - solo wargaming


The Beast of Errinsford


The group at our LFGS that I DM for are currently playing The Beast of Errinsford, loosely based on the module The Black Wyrm of Brandonsford by Chance Dudinack. 

  • 16 Oct
A depleted party carried on with their side-mission of looting collecting magical weapons from the tomb of Sir Errin and his companions.  They had a brief encounter in the marshes with Bullywugs Gullygugs, but managed to pay a toll with a mirror and a toy clay pig.


They got to the barrow, met the sole survivor of another group of looters explorers who (surprisingly, seeing that he was a Goatman, they didn't kill and defile on the spot).  There then followed a surprisingly careful and efficient sweep of the barrow, in which they defeated miscellaneous pests (fricassee of rat) and mollified the undead souls of the ancient heroes.  One of the party - Gimli the Elf - was killed by a giant spider.  There only being two surviving PCs, an unfeasible amount of XP was awarded for the masses of treasure they recovered.


Blood, Bilge and Iron Balls

  • 21 Oct - Trafalgar Day

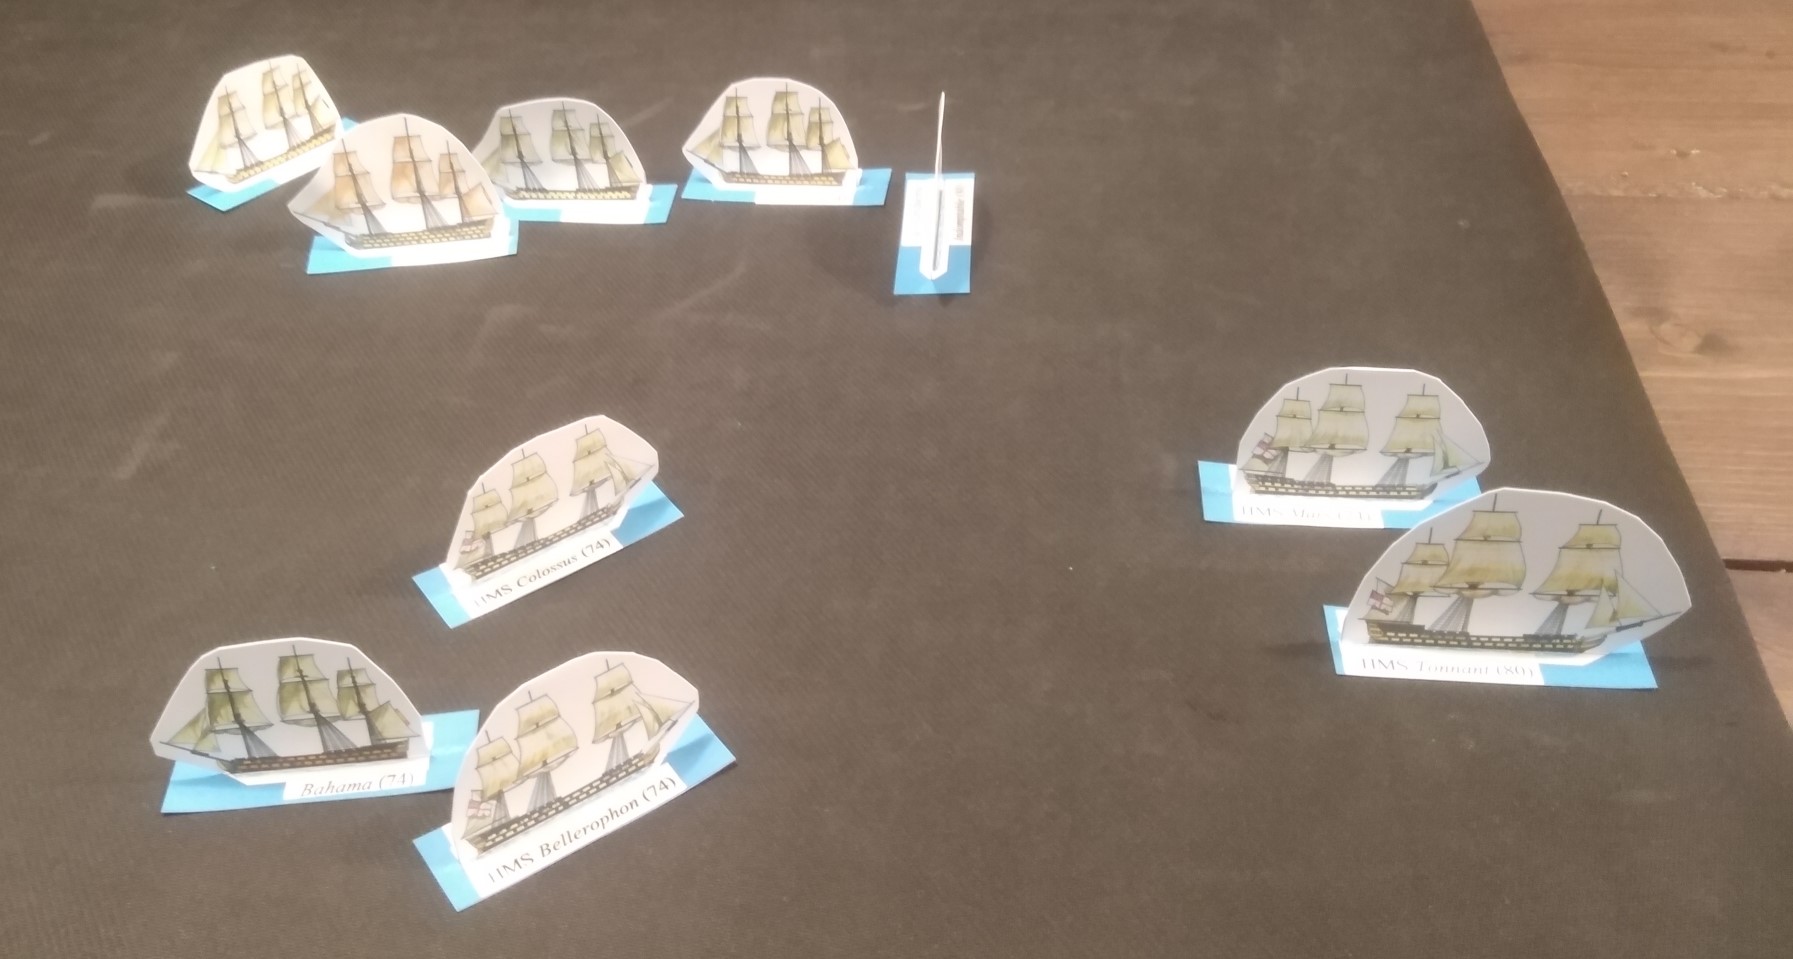
As it was Trafalgar Day, I had of course to have a go at the battle itself.  I used Collingwood's leeward column as the set-up for a solo game using the BBIB rules.

Inevitably, the British fleet suffered heavily on the approach to the Combined line.  It didn't break the line, as the Combined Fleet decided to break and move into melee sooner rather than later (not having to worry about the bigger picture of the battle).  It soon became rather messy and, when I called it after almost four hours of play, It was a British defeat.  

I still have a lot to learn about age of sail tactics and placing ships where they can be most effective.

BBIB has served well for what I wanted it for - an intro to naval wargaming.  It lacks nuance though, and I'm wondering whether to move on to something with a bit more granularity - possibly the Two Fat Lardies Kiss Me Hardy.

Saturday, 22 October 2022

Trafalgar Day 2022 Game

'HMS Royal Sovereign First Through The Line'
by Richard Grenville

 As part of my on-going attempts at solo naval wargaming, I had to mark Trafalgar Day by having a go at part of the battle.  I accordingly booked a suitably-sized table at my local friendly gaming store and broke out Blood, Bilge and Iron Balls again.

Only being human, I couldn't manage the whole battle, but instead played out the attack by Admiral Collingwood's leeward line.  Fortunately, the scenario has been laid out in a free download from Warlord Games.  

In reality, the line wasn't this neat, and
instead was in effect a line of bearing

Turn One


Of course, things started out as in the real engagement.  Collingwood's line, headed by HMS Royal Sovereign, the flagship, raced towards the centre of the Franco-Spanish line.  During this time, they suffered from the combined fire of the line-of-battle.

I made the mistake of not having the British approach under full sail - that would have allowed them to engage sooner and left Bellerophon and Colossus under-utilised in the rear.  In each of these games I learn something new: today's lesson was on effective deployment.

Turn Two


I'd decided to ignore the rest of the battle, so had no compulsion in having the Combined Fleet decide to break the larger formation.  Initially, I thought they would turn in succession at the flagship's position (San Ana in the van)  and run (into the wind!) parallel to the British attack.

In the first departure from history, Royal Sovereign and Belleisle attempted to break the line between Fougueux and Pluton instead of going for San Ana.  The rest of line headed for the gap between Pluton and Algesiras.  By accident, this meant that the Spanish Monarco was in position to rake Royal Sovereign's bows.  


I now realised that turning the Combined line in succession would take too much time (Cape St Vincent anyone?), and instead chose to tack together.  This had the effect of breaking formation and losing the effect of over-lapping fire that line-of-battle is designed to give.


At this stage the British hadn't yet opened fire, but had already suffered 33 hits, including the raking of Royal Sovereign.  It was now in position to fight back, but Royal Sovereign and Belleisle (in the van) were constrained by the command-and-control damage they had suffered (though Royal Sovereign was still able to engage on both sides).  Nevertheless, the single hit on Pluton from Royal Sovereign caused an inferno.

Turn 3


Things got very messy from here on.  The van of the Combined line attempted to wear round and reverse direction, the rest of their line was now heading into the wind.

Bahama suffered major damage (having drawn both jokers among its damage card).  Algesiras rammed Belleisle with the intent to board, but the boarding party was repulsed.  Bellisle turned the tables and moved to board Algesiras.

Turn 4

This now turned into a slugging match.  Ships from both sides found that the interlocked Algesiras/Belleisle their only viable target and decided that the damage to foe was worth damage to friend.  That, and Bellisle's boarding action was enough to force Algesiras to strike.  However, Belleisle was in left a very critical state.

Turn 5

Despite their lack of maneuverability, the Combined fleet remained in a better firing position (I'd allowed the British ships to get into a situation where several were blocking line-of-sight.)  Both Belleisle and Royal Sovereign, Collingwood's flagship, were forced to strike.

In the meantime, Colossus and Bellerophon had made a Bahama sandwich.


Mars and Tonnant both had damaged steerage gear and were therefore forced out of the engagement (Mars was able to make repairs quickly, but Tonnant was last seen heading over the horizon towards the Spanish coast).


Turn 6

The battering continued.  Bahama was unable to control the raging fires on board, which lead to a catastrophic explosion.

Four hours in, I decided to call it a day.

The butcher's bill was high.  The British had received just under twice as many hits as the Combined Fleet: - two ships (including the flagship) had struck and one was forced to leave the field of battle.  In contrast, a French ship had been successfully boarded and captured, and a Spanish ship was sinking.  I determined it to be a victory for the Combined Fleet.

Thoughts

A toast was made to the Immortal Memory
and to the other 4,852 lives lost in the battle

Blood, Bilge and Iron Balls has served well for what I wanted it for - an intro to naval wargaming that allows me to work out the tactics without getting too bogged down in detail.  It lacks nuance though, and I'm wondering whether to move on to something with a bit more granularity - possibly the Two Fat Lardies Kiss Me Hardy.

On 4 Nov 1805 the final action of the Trafalgar Campaign took place when Strachan's squadron caught up with Admiral Dumanoir and defeated him at the Battle of Cape Ortegal.  Perhaps by the anniversary, I will have familiarised myself with a new ruleset.  I shall have certainly have read more of Mark Adkin's excellent Trafalgar Companion - which covers far more than the title suggests.  I still have a lot to learn about age of sail tactics and placing ships where they can be most effective.

Thursday, 26 September 2013

Vice-Admiral Lord Collingwood

Cuthbert Collingwood, 1st Baron Collingwood

Cuthbert Collingwood was born in Newcastle-upon-Tyne on 26 September 1750.  He was entered on the books of HMS Shannon (commanded by his cousin Capt Richard Braithwaite) and went to sea at the age of 11.  He stayed with Braithwaite for over ten years, serving with him in HMS Gibraltar and Liverpool.  In March 1772 he transferred to the Lennox, the guardship at Portsmouth.  He joined HMS Preston, flying the flag of Vice-Adm Samuel Graves, in February 1774 and sailed for North America.  He served as a member of the shore party during the Battle of Bunker Hill and was gazetted as Lieutenant for his actions.

In March 1776 he was appointed to the sloop HMS Hornet under Capt Haswell, serving in the West Indies.  This would not seem to have been a happy ship, and in September 1777 Lt Collingwood faced a court-martial on counts of disobedience of orders and neglect of duty.  He was acquitted, but the court noted the lack of 'cheerfulness on the part of Lt Collingwood in carrying out the duty of the sloop' and 'therefore recommended it to him to conduct himself for the future with that alacrity which is so essentially necessary for carrying on His Majesty's service'.  This would seem to be a black mark that would be difficult to overcome, yet Collingwood was soon appointed to HMS Lowestoffe.  Also serving as a lieutenant on Lowestoffe was Horatio Nelson: the careers of the the two men were to be entwined from now on.  Both men distinguished themselves fighting the French and Americans in the Caribbean.

Collingwood now replaced Nelson in a number of posts in quick succession - First Lieutenant of Lowestoffe; commander of HMS Badger in June 1779; and of the frigate Hinchingbrook in March 1780 (being made Post Captain in this command).  In Hinchingbrook, Collingwood played a leading part in the San Juan expedition - the abortive attempt to cross the Isthmus into the Pacific.  This was dogged by disease, with 180 of an original compliment of 200 of Hichingbrook falling ill (including Nelson, who almost died).  Collingbroke was in command of the expedition during the return to Jamaica.  He was now given command of HMS Pelican, but she was wrecked in a hurricane, the crew being stranded on the Morant Keys for ten days.  Despite the declaration of peace, the West Indies remained a busy station for the navy.  Collingwood, now in command of HMS Mediator, took the side of Nelson (senior captain on the station) in his dispute with the commander-in-chief over the interdiction of American trade.

From 1786 Collingwood spent several years 'on the beach'.  He consolidated his position in Northumberland society and in 1791 married Sarah Blacket, daughter of the Mayor of Newcastle.  They were to have two daughters.

The Glorious First of June 1794
With the outbreak of the French Revolutionary Wars, Collingwood was soon back in action.  In 1793 he was appointed to command HMS Prince, flgaship of Rear-Adm George Bowyer, later moving with Bowyer to HMS Barfleur.  In this ship he took part in the battle of the Glorious First of June (1794) off Ushant. Despite it's name, the outcome of this battle was inconclusive: the British did overwhelm the French fleet, but the convoy that the latter were protecting escaped.  Although Barfleur engaged the French ship Indomptable, which was dismasted, and Bowyer (who had lost a leg) received a knighthood, Collingwood felt that he had been overlooked by not being given the Naval Gold Medal awarded to other commanders.

The Battle of  Cape St Vincent, 1797
Following a spell in the Mediterrean with Nelson, Collingwood was in command of HMS Excellent for the Battle of Cape St Vincent (14 February 1797).   This engagement arose from Spain's declaration of war in 1796, which severely compromised the Royal Navy's position in the Mediterranean.  The Mediterranean Fleet, under Adm Sir John Jervis, intercepted a larger Spanish fleet which was attempting to  rendezvous with the French and then accompany a large convoy across the Atlantic.  Excellent had a distinguished part in this battle, receiving the surrender of the El Salvador del Mondo and the Santissima Trinidad, damaging other ships and assisting Cmdre Nelson in his famous capture of the San Josef and San Nicolas.   Jervis was given and earldom and Nelson appointed KCB.  When Collingwood was informed he was to receive a Naval Gold Medal he refused to accept it until he was also given one for the Glorious First of June.

In February 1799 Collingwood was advanced to the rank of Rear-Admiral (a matter of simple seniority) and appointed to the Channel Fleet, flying his flag in HMS Triumph, later in Barfleur.  In April 1804 he became Vice-Admiral.  In May 1805 he was detached from the fleet with a squadron to reinforce Nelson.  He blockaded Cadiz while Nelson pursued the French to the West Indies and back.  When Nelson intercepted the combined French and Spanish fleets at Trafalgar in October, Collingwood was his second-in-command and led the lee line, flying his flag in HMS Royal Sovereign.  Royal Sovereign was severely damaged during the battle (she had a long duel with the Santa Ana and was dismasted).  With the death of Nelson, command devolved to Collingwood: as the fleet was in a poor state and a storm was advancing, he ignored instructions given by Nelson to anchor.  No British ships were lost during the storm, but several of their prizes were either sunk or escaped to Cadiz.

HMS Royal Sovereign at Trafalgar
On 9 November 1805 Collingwood was promoted to Rear-Admiral and raised to the peerage as Baron Collingwood of Caldburne and Hethpool.  He was awarded an annual pension of £2,000 and received his third Naval Gold Medal (one of only three men to have been awarded three - the others being Nelson and Sir Edward Berry).

Collingwood now succeeded Nelson as Commander-in-Chief of the Mediterranean Fleet.  The next few years were occupied with low-level blockades and diplomatic duties, including an intervention in 1807 when the fleet was sent to the Dardanelles to fly the flag at a time it appeared the Ottomans might join France's war on Russia.  Collingwood's health was deteriorating and in 1810 he received permission to return to England, which he had not visited since 1803.  However, he died on 7 March 1810, shortly after leaving Port Mahon.  His body was brought to England and he was interred in the crypt of St Paul's Cathedral near Nelson's tomb.

Collingwood has not fared well at the hands of naval historians: Laughton's DNB article stated that "where he had Nelson's example or instruction he did splendidly; where Nelson's influence was wanting, he won no especial distinction: and after Nelson's death, as commander-in-chief, he did, at most, no better than scores of other respectable mediocrities who have held high command."  There has been some reassessment in recent years though.  His contemporaries thought highly of him, and he was apparently well-liked on the lower decks.  The Royal Navy named three ships and a training establishment after him.

The Collingwood Memorial at Tynemouth.  
The guns are from HMS Royal Sovereign.